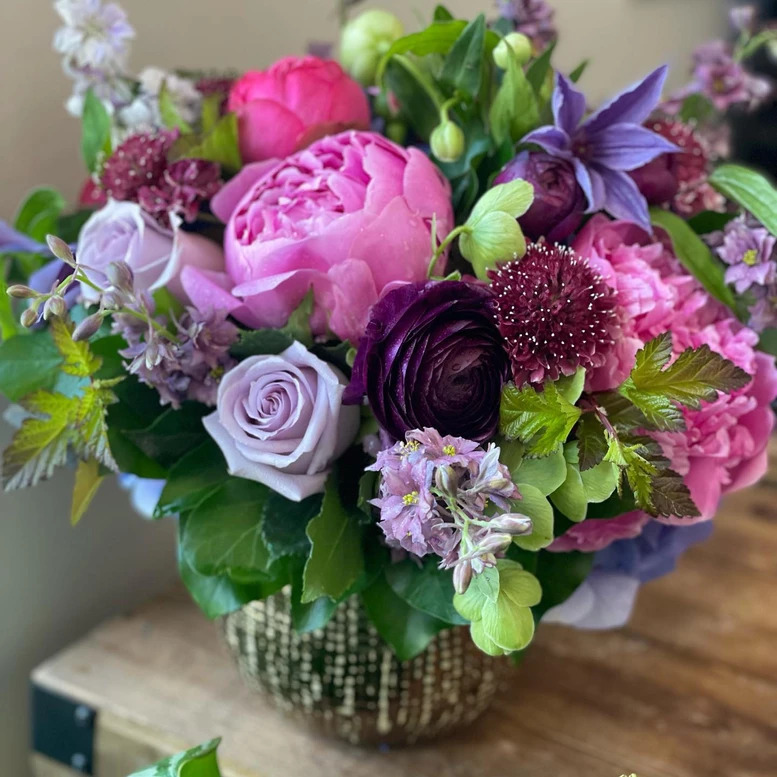
Plum Pink Flower Bouquet Tutorial
Plum tones are trending in the fantastic world of florals. They perfectly complement fall decor and give off that whimsical seasonal feeling. We want your flowers to make guests and lovers feel the magic the way we do here at Helen Olivia Flowers.
So let’s dive into the plum pink power pilot floral arrangement tutorial, exclusively from Helen Olivia Flowers. Feel free to skip to our episode below, or print out our flower arrangement steps and follow along.

1. Pick Your Plum Palette

Flowers
Before we begin, we should talk about choosing the right flowers for your Plum palette. Anything with pink and dark purple tones will look great. You can also play with different veggies in your arrangement. It’s up to your creative mind!
Feel free to mix it up and include some variations of pink and purple in your arrangement. But just in case we’ve got a list of our favorite flowers that went into our Plum Pink Tutorial. These include hydrangea, purple kale, roses, smoked bush, Ninebark, seeded eucalyptus, astilbe, and a vanda orchid.
2. Grab Your Materials
Right, let’s get the practical stuff out of the way first. In this business, we’ve learned that having all of your tools laid out and ready is a huge time-saver. Plus, when you start getting into the creative process, you don’t want to have to break your concentration to search for a pair of pruners that you swore you saw recently, but just can’t remember where. You’ll need the following:
-
A flower arrangement vase
-
A pair of clippers (for the hardier greens)
-
A sharp knife (if you don’t have a floral knife, a small, sharp kitchen knife will do the trick. Just make sure it doesn’t have a serrated edge.)
-
Chicken wire
3. Cut the Flowers for your Floral Arrangement
When it comes to cutting, you can cut your stems before you begin, or throughout the flower-arranging process. Keep your knife handy to shave down any uneven stems.
It’s really important that you always cut with a sharp, clean blade at a sharp angle. This is because when you chop your stems straight across, you limit the surface area of the stem. The greater the surface area, the more water your stem is able to absorb, leading to healthier, longer-lasting bouquets.
4. Add the Right Amount of Water
One of the rules we live by is to always stay hydrated – and that goes for our floral arrangements too. Before we actually start setting up your arrangement, we need to make sure you’re giving your arrangement the right amount of water.
To do this, fill up your vase with room temperature water and leave about an inch of space at the top. This is so that your arrangement won’t overflow. You might also be asking “Why room temperature? Are flowers that fussy?” Well, yes. If your water is too cold, you’ll shock your stems, and if your water is too hot, your flowers will open too quickly and your bouquet won’t last as long.
5. Place the Chicken Wire in Your Vase
Your chicken wire will form the base of your arrangement. Take the smooth edge of your chicken wire and roll it towards the sharp and pointed edge to make a cylinder. Then fold the edges in on the cylinder so it becomes a closed shape.
Then it’s time to maneuver your wire to fit your vase. Keep the wire as open as possible at the top of the vase, so there’s a lot of space for your stems.
We’re working with quite a few thick-stemmed beauts in this particular arrangement (we’re looking at you purple kale), so make sure there’s enough room in the vase and no stems are going to get squished or cut off. There isn’t really a trick to this – you just have to play around until the chicken wire fits nicely.
6. Arranging Your Flowers: Focal Point and Support
First thing’s first: Whatever you’re adding to your arrangement, make sure that you take any low-lying leaves off of the stems so that they aren’t submerged in water. It’s also important that your stems always touch the bottom of the vase, or stay close to the bottom of the vase so that they remain submerged when your bouquet drinks.
Start with flowers that you want to use as your focal point, and place them at the top of the bouquet. We’re using our hydrangeas. but you’re welcome to get creative here. Whatever you’re using for greenery – we’ve got our luscious kale – will go around your focal point flowers to give them support.
If you’re also using kale, feel free to remove some of the leaves around the purple center and manipulate the flower to open it up a bit more.
7. Adding Greenery
Once you’ve got your focal point and support down, it’s time to add some greenery. We’re using Cotinus, or smoke bush, for its gorgeous, deep purple leaves.
Shape your greenery to your liking. This might involve stripping the bottom leaves off so that the greenery fits around the base of the arrangement or splitting your greenery. Then, add them to your bouquet to your liking.
When it comes to drapey, flowy greenery – like our eucalyptus – you want to really show off its shape by letting it hang from the bouquet. Play around with the angle of your greenery until you get the right effect.
8. Condition Your Roses
Conditioning roses is a fancy way of saying prepping them for your bouquet. This involves removing leaves and thorns from the lower stem. There are a few ways to remove thorns.
You can cut them off with shears, pop them off with your thumb, or slice them down the stem with a knife. If you aren’t wearing gloves when you do this, make sure you don’t injure yourself.
9. Have Fun with It
As long as you follow the tips above, flower arranging is all about creativity. There are tons of resources online to give you a bit of arrangement inspiration. Experiment with different height levels and color combos until you’re happy with the result! Keep in mind that stems should be varying lengths depending on where they sit in the bouquet to add dimension to your arrangement.
Again, make sure that your stems are the right length so that they don’t sit above the waterline! You need to keep those stems fresh so that your bouquet lasts for as long as possible.
There You Have it! You’re Done with Plum
When you’re happy with your bouquet, show it the love it deserves. Your floral arrangement is happiest when you keep it out of direct sunlight. When it comes to watering floral arrangements, you should be adding fresh water to them every day. If the water gets a bit gross, feel free to toss it out and replace the water entirely.
For more workshops and tutorials, make sure you register for our floral arrangement classes. Need florals for your event? If DIY isn’t your thing, but you want to order from Helen Olivia Flowers, we offer same-day delivery in Alexandria, VA, and are the top choice for DC florist in the metropolitan area.
Whatever the occasion, for fantastic florals, sit back and relax… Helen Olivia Flowers has you covered!